Are you a Roblox creator looking to elevate your game with unique, custom 3D models and assets that go beyond Roblox Studio's built-in tools? This comprehensive guide on how to use Blender with Roblox is your ultimate resource. For busy gamers and creators, balancing life with passion projects can be tough, but mastering Blender for Roblox development doesn't have to be. We'll dive into practical steps, expert tips, and troubleshooting advice to help you seamlessly integrate Blender's powerful modeling capabilities into your Roblox projects. Learn to create intricate props, stunning environments, and custom characters that will make your experiences stand out, all while optimizing performance and saving valuable time. This article provides navigational and informational insights, addressing common pain points like setup issues, export settings, and animation workflows, ensuring you can build impressive games without getting bogged down by technical hurdles. Discover how to leverage professional-grade 3D software to unlock new creative possibilities within the Roblox ecosystem, enhancing both your skill set and your game's appeal.
How do I install Blender and prepare it for Roblox asset creation?
Installing Blender is straightforward. Visit blender.org, download the latest stable version, and follow the installation prompts. Once installed, there isn't a 'Roblox mode' to enable. The preparation involves familiarizing yourself with Blender's interface, specifically basic modeling tools, object transformations (move, scale, rotate), and understanding how to apply materials. For Roblox, focus on creating low-to-medium poly models, ensuring proper UV unwrapping for textures, and verifying that your model's scale is appropriate (often a 0.01 scale factor during FBX export helps align Blender's default units with Roblox's).
What are the essential Blender settings and optimizations for Roblox models?
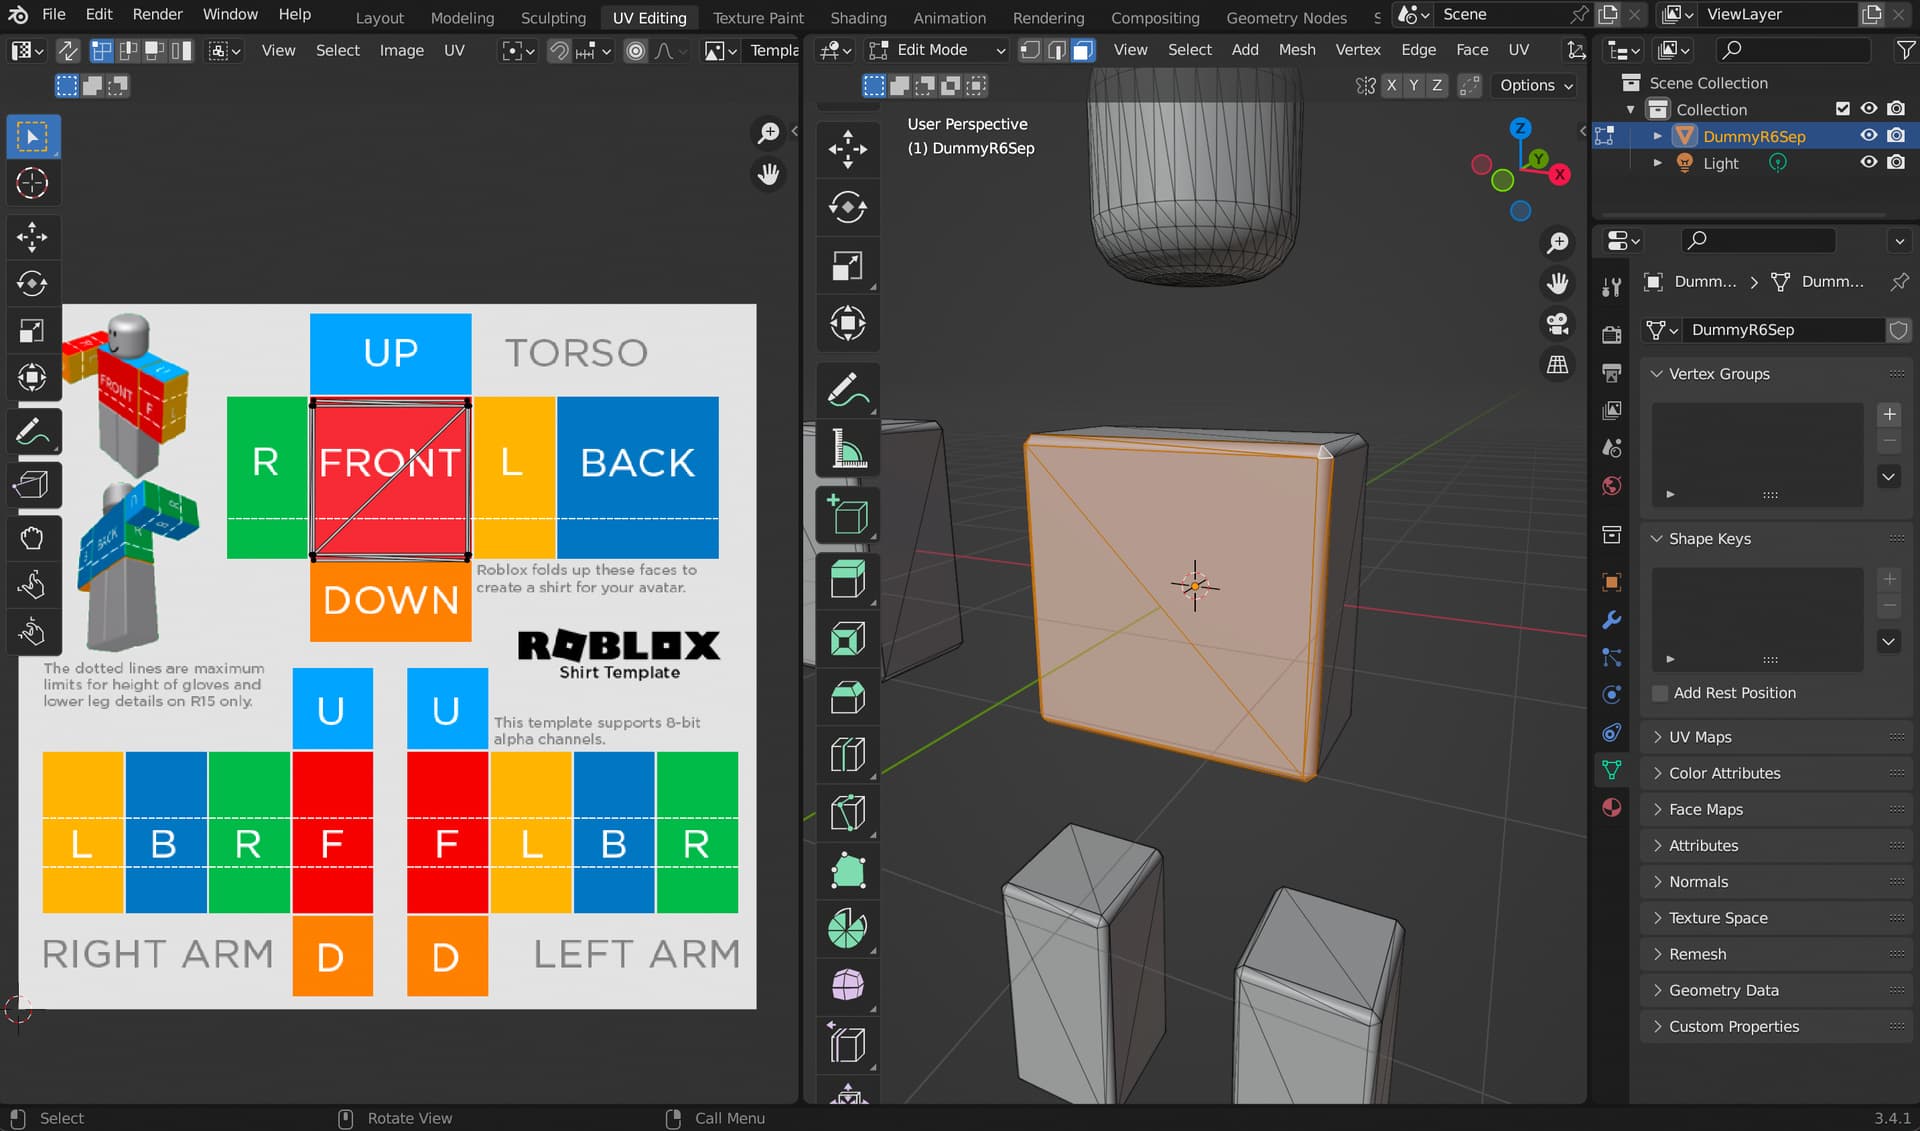
Essential settings for Roblox models in Blender revolve around efficiency and compatibility. Always work in a scale that makes sense for Roblox (e.g., 1 Blender unit = 1 stud, or apply a scale factor during export). Use simple PBR materials for texturing as Roblox Studio supports this well. When exporting, use FBX (.fbx) format. Under export settings, ensure 'Apply Modifiers' is checked, 'Scale' is set to 0.01 (if needed), and 'Geometry' is set to 'Face' or 'None' for tangent space. Critically, keep polygon counts low. For performance optimization, try to keep individual meshes under 10,000-20,000 triangles and consolidate materials where possible.
How do I correctly export models from Blender and import them into Roblox Studio?
To export, select your model in Blender, go to File > Export > FBX (.fbx). In the export dialog, choose 'Selected Objects,' set 'Scale' to 0.01 (if your model is too large), and ensure 'Apply Modifiers' is checked. For importing into Roblox Studio, open your game, navigate to the 'Game Explorer' tab, right-click 'Meshes,' and select 'Import.' Select your FBX file. Roblox Studio will give you import options; usually, default settings work, but you might adjust 'Scale' or check 'Import Animations' for rigged models. The mesh will then appear in your Workspace.
What common issues arise when importing Blender models to Roblox and how can I fix them?
Common issues include incorrect scaling (fix with export/import scale factor), inverted normals (model appears inside out; fix in Blender with Shift+N to recalculate normals outside), missing textures (upload textures separately in Studio and apply via MeshPart's TextureID), or high polygon counts causing lag (optimize with Blender's 'Decimate' modifier before export). Sometimes, complex geometry or non-manifold edges in Blender can lead to import errors; always ensure your mesh is clean and error-free in Blender's edit mode.
How can I animate Blender models and use those animations effectively in Roblox?
To animate Blender models for Roblox, first create an armature (skeleton) and parent your mesh to it with automatic weights in Blender. Then, create your desired animations in Blender's Dope Sheet or Action Editor. When exporting to FBX, ensure 'Baked Animations' is enabled and 'NLA Strips' is checked if you have multiple animations. In Roblox Studio, when importing the FBX, ensure 'Import Animations' is checked. The animations will appear as 'Animation' assets in the 'Game Explorer.' You can then use Roblox's Animation Editor to fine-tune and publish them, linking them to scripts for in-game playback.
Are there specific performance considerations I should keep in mind for Blender assets in Roblox?
Yes, performance is crucial for an enjoyable player experience, especially with Roblox's diverse user base across various devices. Keep mesh polygon counts as low as possible without sacrificing visual quality. Use texture atlases to combine multiple textures, reducing draw calls. Optimize material usage; avoid overly complex PBR setups where simple textures suffice. Ensure efficient UV unwrapping. For dynamic objects, consider breaking them into smaller parts if they have too many triangles. These practices help reduce render load, ensuring your game runs smoothly for all players, a key factor for adult gamers looking for reliable relaxation.
Where can I find additional resources and communities to master Blender for Roblox?
To master Blender for Roblox, leverage the vast online community. YouTube channels like Blender Guru offer fundamental Blender tutorials, while dedicated Roblox development channels provide specific workflow guides. The Roblox Developer Forum (devforum.roblox.com) is an invaluable resource for specific questions and community insights. Joining Discord servers for Blender and Roblox developers allows for real-time interaction and problem-solving. Practice regularly, experiment with different techniques, and don't be afraid to ask questions. Staying engaged with these communities will keep you current on best practices and emerging trends.
In the bustling world of Roblox, where creativity knows no bounds and user-generated content (UGC) is king, many gamers find themselves hitting a creative wall with Roblox Studio's default tools. You're passionate about making your experiences truly unique, but the built-in modeling options can feel limiting when you envision intricate details or stylized characters. For many of us, balancing a job, family, and life's responsibilities means gaming time is precious, and we want to make every moment count. That's why learning how to use Blender with Roblox isn't just a luxury; it's a game-changer for unlocking unparalleled creative freedom and efficiency.
Imagine crafting custom assets – from a weathered ancient artifact to a futuristic spaceship – with professional precision, then bringing them directly into your Roblox world. This capability not only elevates your game's visual appeal but also allows for deeper immersion and player engagement. With 87% of US gamers regularly engaging with their favorite titles, and a significant portion dedicating over 10 hours a week, standing out in the crowded Roblox market is more important than ever. This guide is designed for the modern gamer-creator, helping you navigate the powerful synergy between Blender and Roblox Studio. We'll cut through the jargon, provide actionable steps, and tackle common challenges, ensuring you can enhance your game without sacrificing your valuable time. Let's dive in and transform your Roblox visions into stunning realities.
How Do I Start Using Blender for Roblox Studio?
Getting started with Blender for Roblox involves a few straightforward steps. First, download and install Blender from its official website. It's free and open-source, making it an excellent tool for budget-conscious creators. Once installed, familiarize yourself with Blender's interface; it can seem daunting at first, but focus on basic navigation (pan, zoom, rotate) and object manipulation (move, scale, rotate). The key is understanding that Blender creates 3D models, and Roblox Studio imports these models as meshes. You'll primarily be working with modeling tools, UV mapping for textures, and ensuring your creations are optimized for the Roblox environment. Start with simple objects like a cube or cylinder to practice these fundamental skills before moving on to more complex designs.
Why Should I Use Blender Instead of Roblox Studio's Built-in Tools?
While Roblox Studio's built-in tools are great for rapid prototyping and basic building, Blender offers significantly more power and flexibility. Think of it this way: Roblox Studio is excellent for assembling LEGO bricks, but Blender lets you design and mold those bricks into any shape imaginable. With Blender, you gain access to advanced modeling techniques like sculpting, precise mesh editing, intricate UV mapping, and complex animation capabilities. This allows for highly detailed, stylized, or unique assets that simply aren't possible with Studio's parts. For creators who value relaxation through detailed skill-building, Blender provides a deep dive into 3D art, resulting in visually superior games that capture attention. It empowers you to create custom characters, elaborate props, and optimized environments, giving your game a professional edge.
What are the Optimal Settings for Exporting Models from Blender to Roblox?
Exporting models from Blender to Roblox requires specific settings to ensure proper functionality and appearance. When exporting, use the FBX (.fbx) format as it's generally preferred for complex models and animations, though OBJ (.obj) works well for static meshes. Crucially, ensure your model is triangulated (Blender handles this on export, but it's good to be aware) and has proper UV mapping for textures. In the export options, select 'Selected Objects' if you're only exporting specific parts. Under the 'Geometry' section, set 'Apply Modifiers' and 'Scale' to 0.01 if your model appears too large or too small in Roblox. Ensure 'Tangent Space' is set to 'Face' or 'None' if you encounter shading issues. Always check for loose geometry, non-manifold edges, and inverted normals in Blender before exporting to prevent visual glitches in Roblox. Good optimization here means better performance for your players, which is key for busy gamers who appreciate smooth experiences.
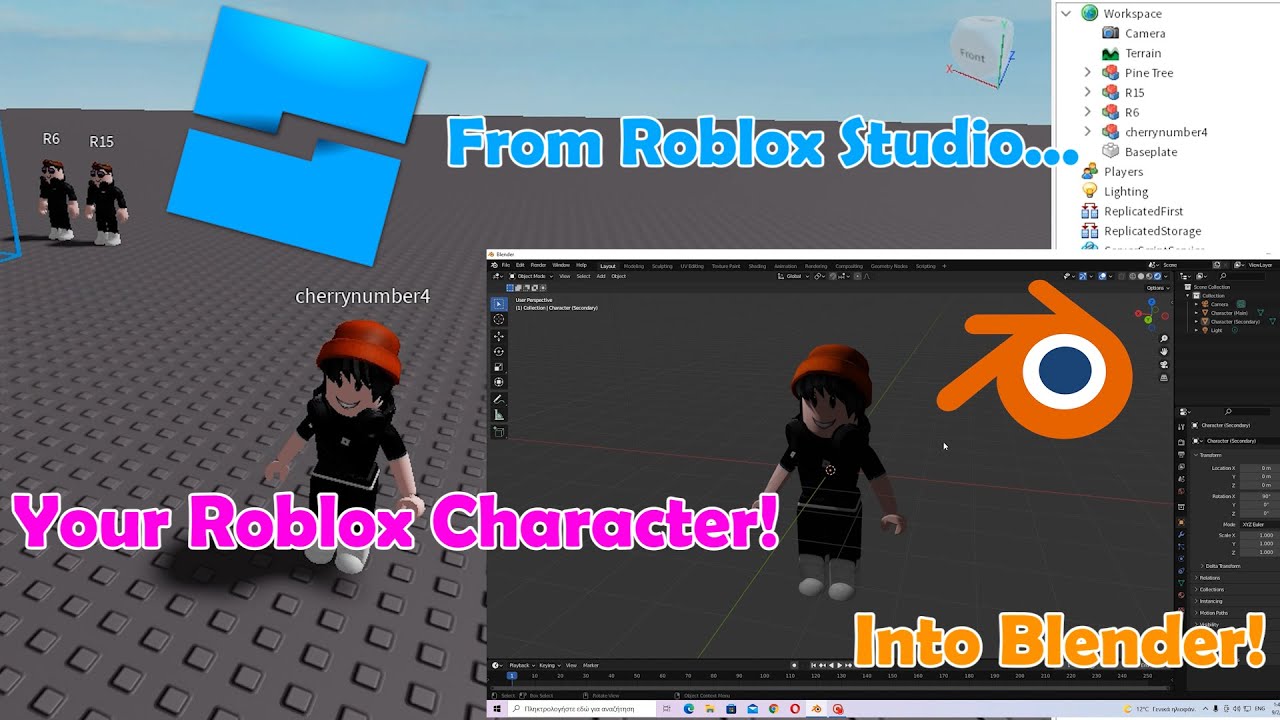
How Do I Import Custom Blender Meshes into Roblox Studio?
Importing your meticulously crafted Blender models into Roblox Studio is straightforward. First, save your Blender file and then export your model as an FBX or OBJ file to a readily accessible location on your computer. In Roblox Studio, open your desired game project. In the 'Explorer' window, select where you want your mesh to appear (e.g., Workspace, ReplicatedStorage). Then, navigate to the 'Game Explorer' tab, right-click 'Meshes' and select 'Import.' Locate your exported FBX or OBJ file and click 'Open.' Roblox Studio will prompt you with import options; usually, the defaults work well, but you might need to adjust 'Scale' if your model is disproportionate. If it's a character or complex animated model, ensure 'Import Animations' is checked. Once imported, your mesh will appear in the Workspace, ready for texturing, scripting, and integration into your game world.
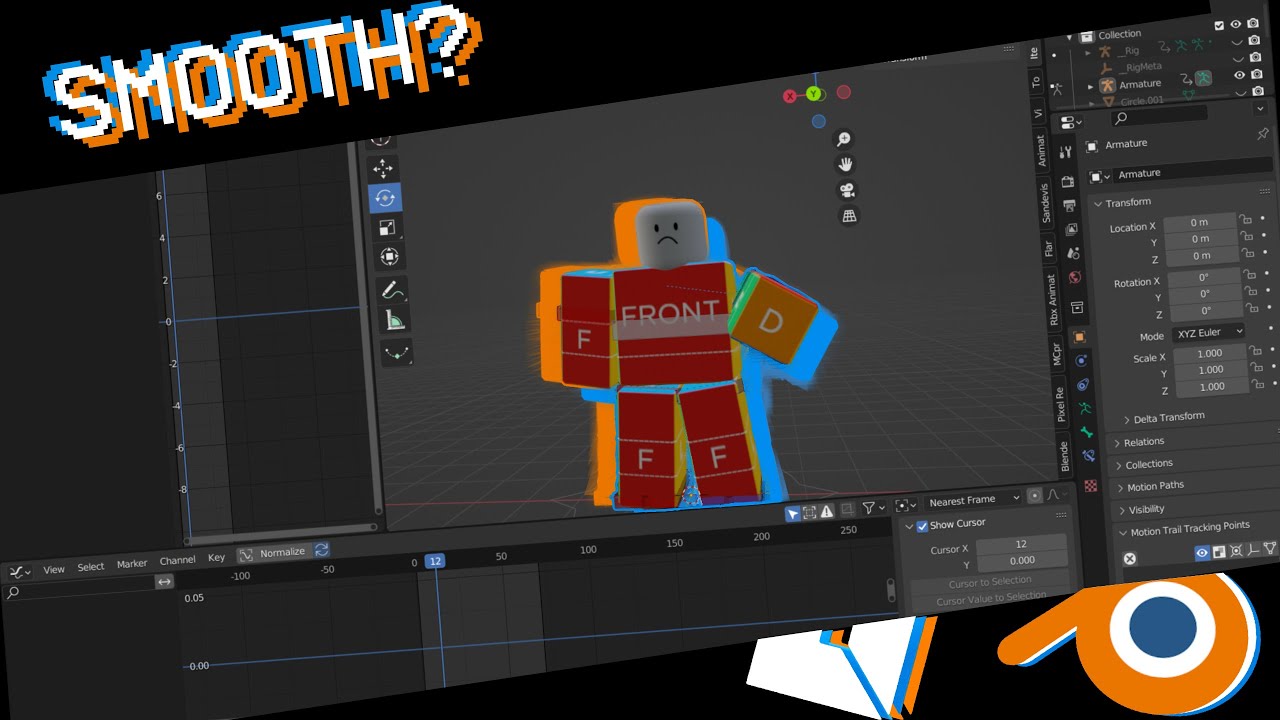
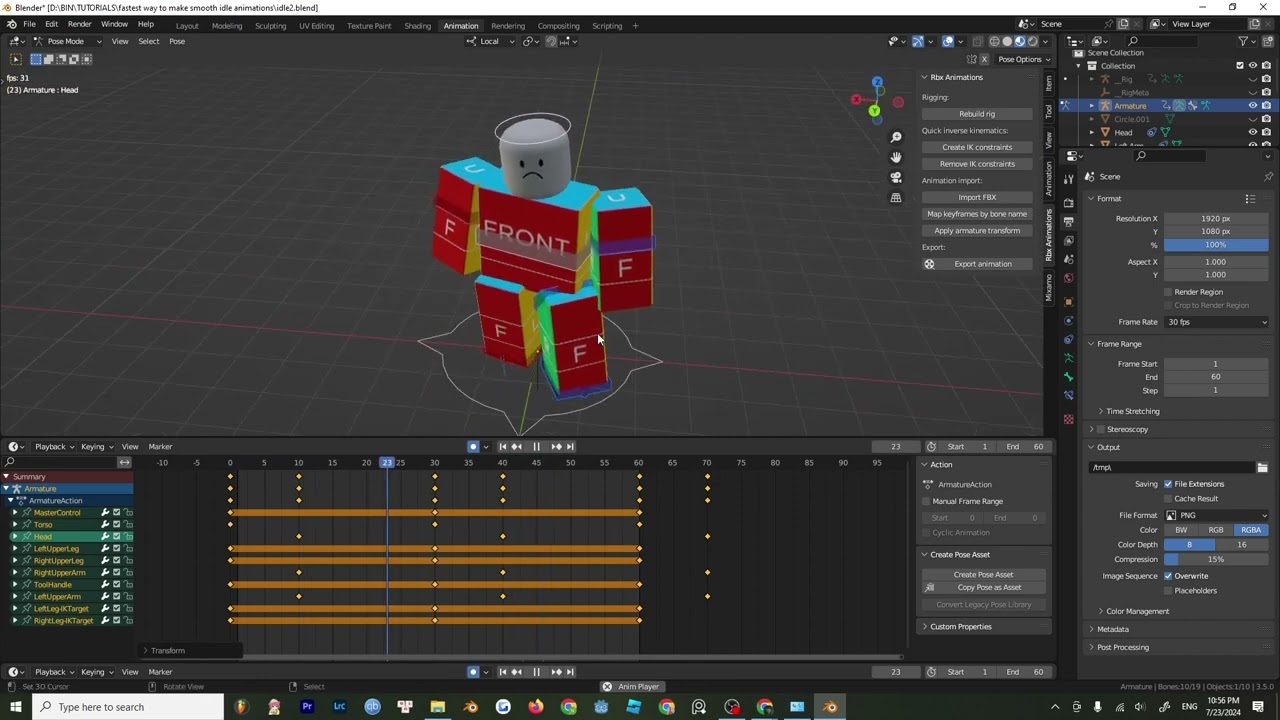
Can I Animate Blender Models and Use Those Animations in Roblox?
Yes, absolutely! Animating your Blender models for use in Roblox adds a whole new layer of dynamism and interactivity to your games. The process involves creating an armature (skeleton) in Blender, skinning your model to it (weight painting), and then creating your desired animations within Blender's animation timeline. When exporting, make sure your animation is included in the FBX export options. In Roblox Studio, when you import the FBX, ensure 'Import Animations' is checked. The animations will be imported as 'Animation' assets. You'll then use Roblox Studio's Animation Editor to fine-tune and publish these animations. From there, you can write scripts to play these animations in your game, bringing characters, creatures, and moving props to life. This is a powerful way to enhance social play and skill-building within your game, giving players a more polished and engaging experience.
What are Common Troubleshooting Tips for Blender to Roblox Workflow?
Dealing with issues during the Blender to Roblox workflow is part of the learning curve, but most problems have simple solutions. If your model appears invisible or has weird shading, check the normals in Blender (Shift+N to recalculate outside). If it's too big or too small, adjust the 'Scale Factor' during FBX export or during import in Roblox Studio. Missing textures often mean the texture files weren't properly packed into the FBX (or are not PBR ready) or need to be manually uploaded as 'Decals' or 'Textures' in Roblox Studio and applied to the MeshPart's 'TextureID' property. Performance issues? Your mesh might have too many triangles. Try using Blender's 'Decimate' modifier to reduce polygon count without losing too much detail. Always verify your model in Blender's viewport shading modes before exporting to catch issues early. Remember, patience and systematic checking are your best friends here.
Where Can I Find Resources and Communities to Learn More?
The Blender and Roblox communities are incredibly vibrant and supportive, offering a wealth of resources for learning. For structured learning, check out official Blender tutorials on YouTube (Blender Guru is a classic) and specialized Roblox development channels. Many content creators focus specifically on 'Blender for Roblox,' offering step-by-step guides. Join Discord servers dedicated to Roblox development and Blender communities; these are fantastic places to ask questions, share your work, and get real-time feedback. Websites like DevForum.roblox.com and Blender Stack Exchange are also excellent for specific technical queries. Remember, consistent practice, experimenting with different tools, and engaging with the community are key to mastering this powerful combination. Staying current with trends and connecting with fellow creators makes the journey even more rewarding.
As busy gamers, we often seek experiences that offer relaxation, skill-building, and social connection. Mastering how to use Blender with Roblox unlocks a new dimension of creative expression, allowing you to craft truly unique worlds and assets that resonate with players. It's a journey of continuous learning, but the rewards are immense: building games that stand out, optimizing performance for a smooth player experience, and gaining valuable 3D modeling skills that extend far beyond Roblox. You're not just playing games; you're building them, shaping digital worlds, and connecting with a global community of creators. So, take that leap, embrace the power of Blender, and let your imagination soar in Roblox.
What's your biggest challenge when creating assets for Roblox? Comment below and let's share solutions!
FAQ Section
What is the best way to optimize Blender models for Roblox performance?
To optimize Blender models, aim for a low polygon count using modifiers like Decimate. Combine multiple meshes into one where possible to reduce draw calls. Use efficient UV mapping and atlas textures. Ensure proper scale to avoid Roblox's automatic scaling issues and verify that all normals are facing outwards for correct rendering.Is it free to use Blender for Roblox game development?
Yes, Blender is completely free and open-source software, making it an ideal choice for creators on a budget. This means you can access professional-grade 3D modeling, sculpting, and animation tools without any upfront cost, significantly lowering the barrier to entry for advanced Roblox development.How do I apply textures from Blender to my imported Roblox mesh?
After importing your mesh into Roblox Studio, the textures usually need to be uploaded separately. Upload your texture images as Decals or Textures to Roblox. Then, select your imported MeshPart in Studio, and in the Properties window, set its 'TextureID' to the Asset ID of your uploaded texture. For PBR, you'll manage maps like normal, roughness, and metallic through MaterialVariants.What are common polygon count limits for Roblox assets?
While Roblox doesn't have a strict global polygon limit, it's generally recommended to keep individual MeshParts under 10,000-20,000 triangles for optimal performance on most devices. Complex models should be broken into smaller, manageable MeshParts. Keeping total triangles per visible scene low ensures a smooth experience for players, especially on mobile, which dominates the gaming market for many.Can I rig and animate a custom character from Blender for Roblox?
Yes, you can rig and animate a custom character in Blender and import it into Roblox. This involves creating an armature (skeleton), parenting your mesh to it with automatic weights, and then creating animations. When exporting to FBX, ensure animations are included. Roblox Studio will import the character and its animations, which can then be used with its Animation Editor and scripting.Are there any specific Blender addons recommended for Roblox creators?
While not strictly necessary, some community-made addons can streamline the workflow. Look for addons that assist with efficient UV unwrapping, mesh cleanup, or even some specialized Roblox export helpers. Always ensure addons are reputable and compatible with your Blender version. Many popular Blender tutorials will recommend specific ones as well.Seamlessly integrate Blender 3D models into Roblox Studio, optimize assets for Roblox performance, troubleshoot common import and export issues, animate custom Blender creations for Roblox, enhance game visuals and player engagement, build advanced 3D modeling skills for Roblox development.
35


How To Animate Rigs In Blender For Roblox Studio Roblox Blender . Get Blender Models To Roblox HOW TO MODEL Roblox Studio YouTube . Animate Your Roblox Avatar In Blender . Animate Your Roblox Avatar In Blender . Animations Blender To Roblox Made Easy


Roblox Avatar To Blender Your Easy Guide . Roblox Avatar To Blender Your Easy Guide . Roblox Avatar To Blender Your Easy Guide . Animating Two Rigs In Roblox Studio A Simple Guide . Roblox Studio How To Animate Roblox Character In Blender YouTube


How To Use Blender To Make Roblox Models At Donald Childress Blog . How To Use Blender To Make Roblox Models At Donald Childress Blog . Animate Your Roblox Avatar In Blender . Animate Your Roblox Avatar In Blender . Fastest Way To Make Smooth Idle Animations In 5 Minutes Roblox Blender


How To Make A Simple Idle Animation For Roblox Blender YouTube . Roblox Avatar To Blender Your Easy Guide . Blender To Roblox Imports Easy Step By Step Tutorial YouTube . Roblox Studio How To Import Blender Projects Into Roblox Studio YouTube . How To Use Blender With Roblox At Blake Sexton Blog


Blender To Roblox Studio How To Import Blender Model Into Roblox With . Roblox 3D Models To Blender Tutorials Tips And Tricks Blender . Blender Tutorial How To Use BLENDER For ROBLOX Thumbnails 2024 YouTube . Is It Possible To Paint On A Roblox Rig E G Blender And Export That . How To Animate 2 RIGS In Blender Import To Roblox Studio YouTube


Blender Rig Download Roblox At Louis Mitchell Blog . NEW How To Use Blender For Roblox Accessories In 2026 YouTube . Blender Rig Download Roblox At Louis Mitchell Blog . Blender Rig Exporter Animation Importer Page 66 Community Tutorials . Blenders UI Mit Workspaces


Animations Blender To Roblox Made Easy . Blender Importing Rotations And Positions Building Support . OUTDATED DO NOT USE How To Install And Use The Roblox Blender . What Is Blender For Roblox At Kenneth Negron Blog . Blender For Roblox Studio Blender Animation Roblox LTAX